Step 4: Map Placeholders to Data Fields
Time to complete: ~2 minutes
What you'll do: Connect each placeholder to a field in your data source
What you'll need: Placeholders added to your template and data source connected
Mapping is where you tell Gdocify "whenever you see this placeholder, replace it with data from this field." It's like connecting the dots between your template and your data.
What Is Mapping?
Mapping is the process of connecting each placeholder in your template to a specific field in your data source. For example:
{{candidateName}}→ maps to the "Name" field in Airtable{{candidateEmail}}→ maps to the "Email" field in Airtable{{skills}}→ maps to the "Skills" field in Airtable
Opening the Mapping Configuration
- Click the "Placeholder Mapping" button (left floating button)
- You'll see two tabs: "Mappings" and "Sections"
- Click on the "Mappings" tab
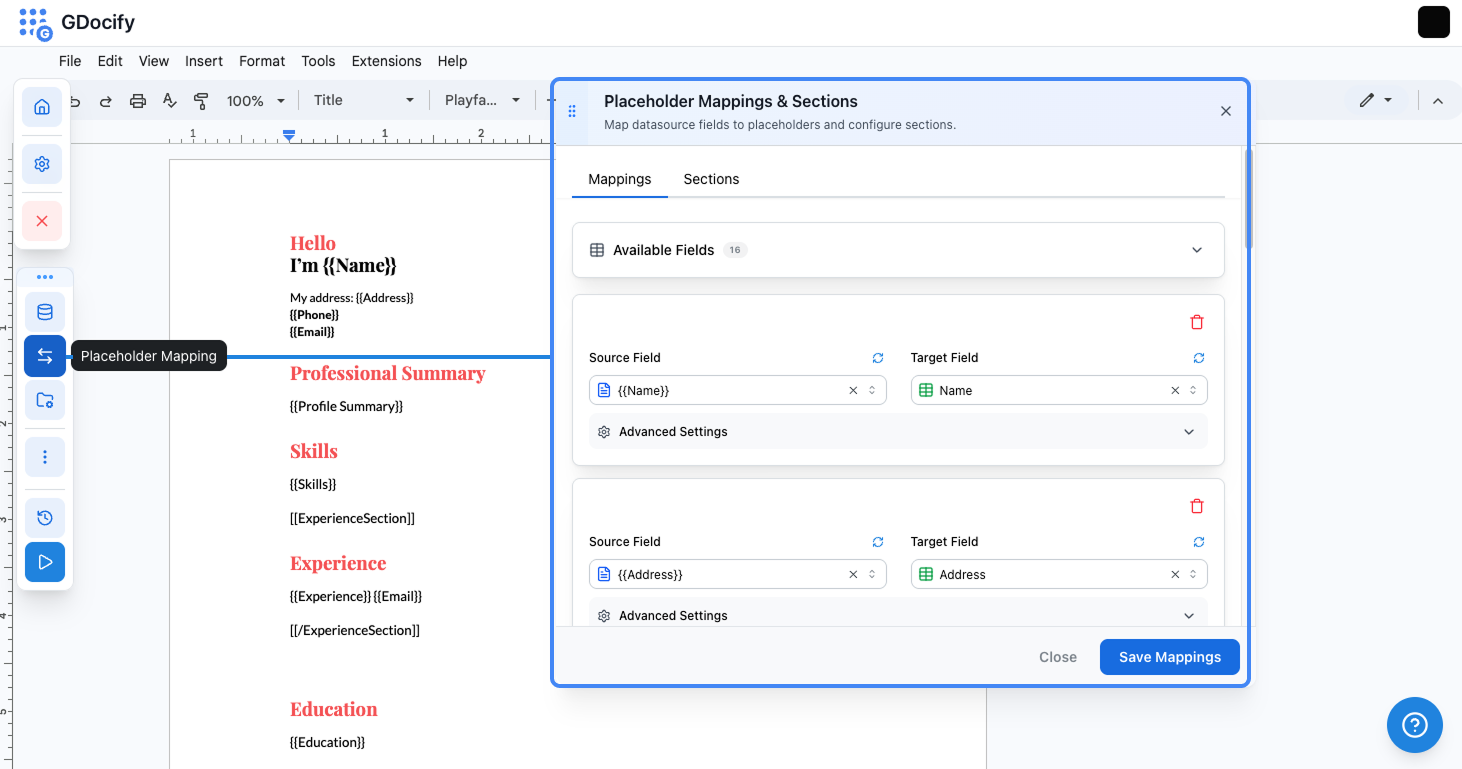
Mapping Your Placeholders
For each placeholder in your template:
- Find the placeholder in the list (Gdocify automatically detects all placeholders)
- Click the dropdown next to the placeholder name
- Select the data field from your data source that should fill this placeholder
- Repeat for all placeholders
Example Mapping
Let's say you have a resume template with these placeholders:
{{candidateName}}{{candidateEmail}}{{candidatePhone}}{{skills}}
And your Airtable has these fields:
- Name
- Phone
- Skills
Your mapping would look like:
{{candidateName}}→ Name{{candidateEmail}}→ Email{{candidatePhone}}→ Phone{{skills}}→ Skills
Advanced Settings
For each mapping, you can configure:
- Markdown Formatting: Enable if your data contains markdown that should be rendered
- Conditions: Show or hide this placeholder based on rules
- Delete Paragraph: Remove the entire paragraph if the placeholder is hidden
We'll cover these advanced features in the Features section.
Verifying Your Mappings
After mapping, you should see:
- All placeholders have a data field assigned
- No unmapped placeholders (unless intentional)
- A confirmation that mappings are saved
Tips
- Use similar names: If your placeholder is
{{candidateName}}and your field is "Candidate Name", the mapping is obvious - Test one at a time: Map a few placeholders, test, then add more
Common Issues
- "Field not found": Make sure you've selected the correct data source and refreshed the fields
- "Placeholder not detected": Check that you used the correct syntax
{{placeholderName}} - "Mapping not saved": Click the "Save" button after making changes
What Happens Next?
Once all placeholders are mapped, Gdocify knows exactly what data to use. Now you need to configure where the generated documents will be saved. Continue to Step 5: Configure Result Settings.